Thursday, January 6, 2011

Guide Documents

Rather than a bringing a heavy guide book, 95% of which we probably won't use, I make my own guide, tailored to our itinerary and interests. I create the following documents for our trip:
  • Transportation
    Mostly airline and intercity rail travel information.
  • Lodging
    This is usually the last document completed. It contains complete information about when and where we plan to stay.
  • Attractions, Food, and Souvenirs
    This is the usually largest document and it's organized by region.
  • Shopping
    We carry this with us for the duration of the trip because we never know when we'll have some extra time for shopping.
  • Vocabulary
    This contains handy phrases for use at places of lodging, in transit, at attractions or restaurants, and when shopping.
  • Contact Information
    Essential phone numbers.
The documents are created in Open Office or Microsoft Word. Unfortunately Google Docs doesn't support furigana, which is a necessity for me and most other Japanese language learners. It sure would be nice to have these documents available in the "cloud" so we could work on them collaboratively. After printing out the documents, I carry them in a loose leaf binder. I use a laser printer because the laser printing doesn't run if it gets wet. As we go, I discard sections that are no longer needed.

These guides are an iterative process. As we find more about sights in a certain region, we might adjust our transportation and lodging information.

Now that e-readers are becoming more convenient, we're looking into carrying the commercial guides with us as a supplement.

What should you put in your guide documents? That depends upon your interests. In a later post, I'll go in to details about what we include for each document and where we get that information.

Friday, December 31, 2010

Sticker Fun for Grown-ups

In addition to charms dangling from cell phones, embossed stickers on cell phones are becoming popular. Some of the stickers are good for personalizing your laptop or other gear. They come in a lot of uniquely Japanese styles, which make them great for souvenirs or omiyage. What's neat is about these stickers is that they're composed of multiple sections that are held in position until you apply them. You can find these embossed stickers in electronics stores such as BIC Camera. If you weren't looking for them, you'd probably never see them, so look for them hanging on a wall near the cell phones.

We got some for our laptops. Check out the rabbits viewing the moon on the Mac and the maneki neko with bells and coins on the HP netbook.

Saturday, November 20, 2010

Loading Destinations onto Your GPS

This process just got a whole lot easier. I used to have to copy and paste latitude and longitude as waypoints from an on-line map into my Garmin Map Source application, export the waypoints to GPX format, use GPS Babel to convert the waypoints to points-of-interest (POI), and finally use Garmin's POI Loader to load the points onto the GPS.

The Garmin Communicator Plugin makes this task a lot easier. You just need to highlight a marker on a Google Map, right click, and select the Send option. If your GPS is plugged into your PC, it'll be discovered and allow you do download the location directly. The location is installed as a waypoint, rather than a POI, which is a little bit of a disadvantage because waypoints are limited to a shorter text strings than POIs on many GPSs.

I've found the Communicator Plugin works best when you've only got a single marker on the map. If you have multiple markers on the maps, as when you do a Google Map search, you don't get to edit the name of the waypoint. To create a single marker you can edit and download, it's best to either use Google's My Maps or enter the coordinates directly into the search bar.

I generally load my GPS with the locations of interesting stores and restaurants, sights, our hotels, and ATM locations near the hotels. Of course with any piece of electronic gear, you need a back-up, so I always carry paper maps in my knapsack.

Monday, September 6, 2010

What's for breakfast?

When we're traveling we like to get something quick, inexpensive, and most importantly delicious for breakfast. It's also fun to try something we've never had before.

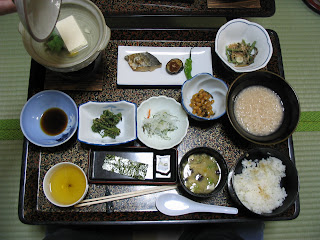
When staying at a Ryokan (Japanese inn), or Minshuku (bed & breakfast) it's worthwhile to get breakfast if it's offered. The food usually comes in many small dishes, and the contents of these dishes varies from lodging to lodging and region to region. If there's something you can't figure out how to eat you can always ask your hosts 「これの食べ方はどうですか。」- "How is this eaten?". When you are done, don't forget to tell them - 「ごちそうさまでした」- "It was a feast".


Self-serve bakeries are another good place to get a quick breakfast. These shops are often near train stations, and usually don't have a place for you to sit and eat. If they do have a seating area and you wish to use it, you are sometimes expected to buy a beverage. You will know this because they will ask you 「お飲み物は…」- "and to drink...?" At the entrance there will be a stack of trays and a box of tongs. Grab a tray and tongs, then select what ever looks good to you. メロンパン - Melon bread and あんパン - buns stuffed with sweet bean paste are always good. For something more heartier you can get ウイナー - pup in a blanket.

If you don't mind your bread a little stale, you can sometimes get a big discount before the store closes. This usually takes place around 22:00. You can tell something is up because people start crowding around but nobody's buying anything. Then the signs come out reading 「30%OFFタイムサービス」or「三割引」and it's a mad dash for the best pastries. Both of these mean 30% discount. 割引 is a 10% discount, so 三割引 means 30% discount.

There's a chain of restaurants that I like called Yayoiken. All their breakfasts are under ¥500. They are typical Japanese light breakfasts usually consisting of some combination of fish, rice, natto, miso shiru, or (this always shocks foreigners), green salad.

Check out their breakfast menu under the 朝食 heading.
http://www.yayoiken.com/menu/index.html
They are located in most major cities.
http://www.yayoiken.com/tenpo/index.html

You first pay for your meal at a 食券 販売機(しょっけんはんばいき)- a meal ticket vending machine inside the restaurant. I can't recall whether or not the machine had pictures or words. I usually keep my dictionary handy in either case. You can buy your drink at the counter.

Unless you are going an a major hike first thing in the morning, you don't want fill up too much because there are always opportunities along the way for tourists to purchase and taste the 名物 - local specialities along the way.

Sunday, August 29, 2010

Laundry

Laundry is problematic. On one hand, we want to travel light, but on the other hand we don't want do spend our vacation doing laundry. We carry about six days worth of clothes. The hotel or ryokan may have a washing machine, but there is almost always a queue, especially in the evenings.

Most washers and dryers are similar to those in the west, except they are usually smaller. The dryer's lint trap is a plate shaped screen in the back of the drum. Be sure it's cleared of lint. Depending on your clothes, it usually takes at least two runs through the dryer, and if it's plugged with lint it will take longer.

There is almost always a laundry detergent vending machine in the laundry room.

One place we stayed at, Hotel Area One in Kagoshima, has a washing machine and dryer in one. You don't have to add soap either, as it's fed in from a tube. The strange thing about this washer is that it locks your clothes in until it's done.

If your place of lodging doesn't have a washing machine, an interesting thing to try is a local coin laundry. You can get a taxi ride from your hotel or ryokan. It might be best to take your clothes in a trash bag, rather than your suitcase, so your hosts don't think you're skipping out on the bill. Your hosts may also be able to recommend a near-by laundry. Sometimes coin laundries are located in covered malls and you can go shopping if it's not too late. You may also meet interesting people. While your clothes are in dryer you can study Japanese by reading the signs the signs on the walls. Try this one:


If you do wash at night and your place of lodging has a curfew, make sure you get back before the front desk closes.

Here is some useful vocabulary from Jim Breen's dictionary.

洗濯 【せんたく】Laundry
洗濯石鹸 【せんたくせっけん】Laundry soap
洗濯機 【せんたくき】Washing machine
コインランドリー (n) laundromat; laundrette
洗濯ばさみ 【せんたくばさみ】Clothes Pin
1000円札をくずしていただけませんか。 Could you change a Y1,000 note?

I especially like the word くずす - literally crush or destroy. Used here to mean "make change".

One way to stretch out the time between having to do laundry is to do it in your room. This is one reason to pay a little more for a room with a bathroom (some minshiku and ryokan have community facilities). Often the bathroom will have a clothesline in the tub/shower. You may want to bring your own line and some small plastic clothes pins or buy them at a 100 yen store. We travel with little packets of Woolite and wash clothes in the sink. This is why we wear synthetics almost exclusively. Although wool and cotton are comfortable, they take forever to dry, especially if the weather is humid.

Saturday, August 28, 2010

Coin Lockers


As you travel you'll probably need to be carrying some luggage. When you arrive at your destination before check-in time, or you stop at a city en-route, what do you do with your luggage? The answer is to find a coin locker. Almost every train or bus station has some. They are easy to use. They come in various sizes. Just put your bags in, close the door, insert the indicated amount of money, and lock the door, taking to key with you. Just don't lose the key!

Finding coin lockers can sometimes be tricky as they can be located in obscure, low-rent areas of the station. You can ask a station employee, information desk attendant, or a passer-by who doesn't look to be in too much of a hurry: コイン ラカー は どこ ですか。Sometimes if the station is very small, for example, Juuniko Station on the Gono Line, there may be no lockers, but there may be a shop nearby that will hold you bags all day for a few hundred yen.

Airline type carry-on cases work pretty well, but may not quite fit in some coin-lockers. Even though the cases are basically soft-sided, many have some rigid pieces in the wheels or the extending handles. In most cases a 21 X 14 X 9 inch bag will fit into lockers designed for carry-ons, but in a few cases, the bags didn't fit and you'll have to pay for a larger locker. Don't give up to quickly on the smaller locker, though. Sometimes you can insert your bag horizontally, then rotate, applying some topological gymnastics to get it to fit.

Most lockers take 100 and 500 yen coins, so you'll want to make sure you have plenty of change on hand. In Tokyo I've seen large blocks of lockers that use Suica contact-less stored value cards. Someday we might all have to learn how to get a Suica card if the old-fashioned coin lockers become too scarce.

In large stations, it's possible to lose your locker. Tokyo Station has three central exits on each side, so sometimes it's not good enough just to remember that your bags are in the lockers by the central exit. Tokyo Station also has lockers on multiple levels, making it even easier to lose your bags. Since the lockers are almost always indoors or underground, marking the location with you GPS won't work. You could take a picture of the location, but above, you see a photo of us closing our locker, only to require the help of a police officer to find it again. I think the best way is to acquire a map of the station - these are available on pamphlets and fliers on racks or at information booths - and mark the location of your locker on the map. Another good location for 3D station maps is the Internet, but you generally have to print the map out before you go.

Finally, I don't believe it's permitted to leave your bag overnight in the locker, so include a trip back to the locker before heading to your hotel or other final destination.

Friday, August 13, 2010

Nihongo on Ubuntu Linux

To read and browse Japanese on Ubuntu Linux, you don't need to do anything. The Japanese fonts are already installed. To be able to enter Japanese text it's a little more tricky. On newer versions, Ibus is the way to enter text with languages other than English. On the web you'll see lots of references to Scim - don't use it. It's obsolete. Ibus should already be installed. If not, get it from the Ubuntu Software Center.

You will need "Anthy" input method for Japanese. Get that from the Ubuntu Software Center.

The next step is to configure Language support under System, Administration. Click Install/Remove Languages to add Japanese. Then go to "keyboard input method system", select "ibus", and close the window.

Now start Ibus. That's under System, Preferences, Ibus. It will prompt you to start the Daemon - you will do this every time you log in, unless you edit the .bashsc file as indicated. To do this, copy the text, paste it into Gedit, and save it as .bashsc in your home directory. Be careful that you aren't overwriting an existing .bashsc. If there's already one, add those lines to it.

Once you've started Ibus the Preferences dialog will appear. Click the Input Method tab and Select the Japanese input method "Anthy" (It's got a little crown icon). Click Add, then click Close.

Now open a text editor or browser and put the cursor on a text entry area. You will see a keyboard icon in the top right tool bar and a strange white square in the lower right of your desktop. Click the keyboard icon, and click the Japanese - Anthy from the drop-down menu. Now the strange white square will become a bar that shows the Anthy options. A hiragana あ is displayed so now you can type hiragana and kanji. Click the あ to select katakana when you need it.